
This guide covers the process of exporting aftermarket domain listings from Afternic and importing them into Spaceship SellerHub. Your new SellerHub listings will appear in the Spaceship search, Namecheap search, Namecheap Marketplace, and optionally utilize their custom landers.
TL;DR
- Domains can be exported from Afternic, including their current prices and casing, and imported into SellerHub with a few changes made to the exported .csv file.
- SellerHub offers a lower commission rate of 5% versus Afternic's 15%.
- Your domains do not need to be registered with Spaceship to sell them on SellerHub.
- Your domains listed on SellerHub can still remain on Afternic and be sold through Afternic's partner syndication syndication, but Afternic will charge a higher commission for any sales (25%).
Export From Afternic
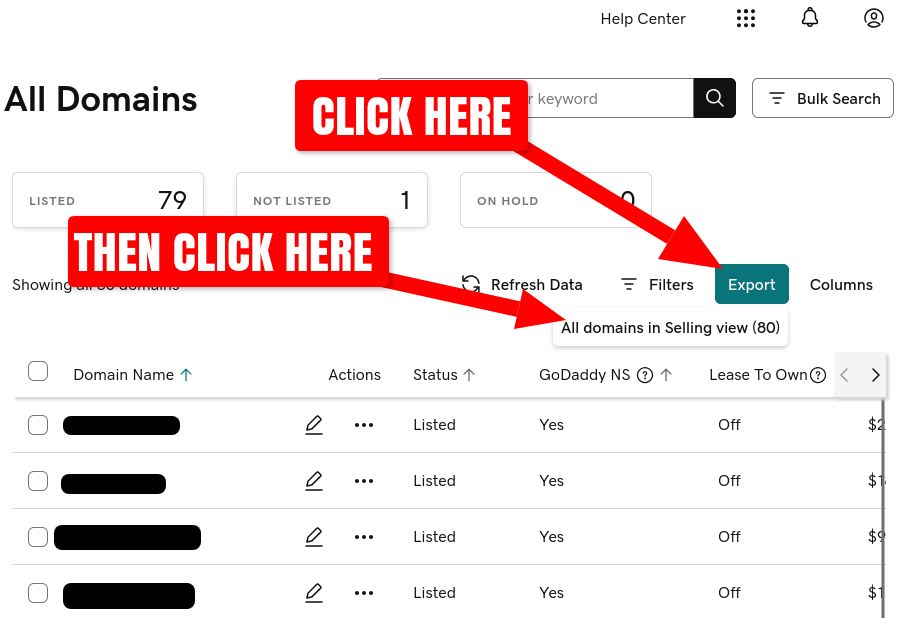
Log in to your Afternic account and navigate to the Portfolio > All Domains page using the navigation links in the left-hand sidebar. Click the Export button near the top of the page and then click the All domains in Selling view option:
The Afternic website will generate a CSV file (a simple column/row based text file) of your domains and prompt your browser to download the file, with a name such as domains-12345689.csv. Save the file locally to your device.
Next, open the saved CSV file with your preferred spreadsheet software. A few changes need to be made to the file so that it can be imported directly into Spaceship's system.
Below are some options depending on your operating system platform:
| Software | Operating System/Platform | Notes |
|---|---|---|
| Google Sheets | Web (cross-platform), Android, iOS | Cloud-based, real-time collaboration, free with Google account, accessible from any OS with a browser. |
| Microsoft Excel | Windows, macOS, Web, Android, iOS (via Office 365) | Industry-standard; powerful data analysis tools, advanced formulas, pivot tables, extensive compatibility. |
| LibreOffice Calc | Windows, macOS, Linux | Free and open-source, cross-platform, good for offline use and for users on Linux or mixed OS environments. |
| Apple Numbers | macOS, iOS | Built for Apple ecosystem, free for Apple users, nice UI for smaller personal or design-oriented spreadsheets. |
| WPS Office Spreadsheets | Windows, macOS, Linux, Android, iOS | Cross-platform, often compatible with Excel file formats, free option, a lighter alternative to Excel for many users. |
Upload CSV to Google Sheets
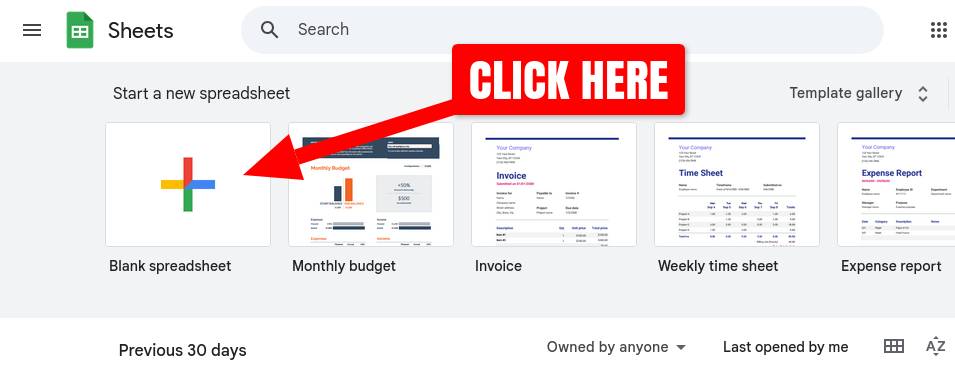
For this example, we'll use Google Sheets to make the necessary modifications to the exported Afternic CSV file. Start a new Blank spreadsheet:
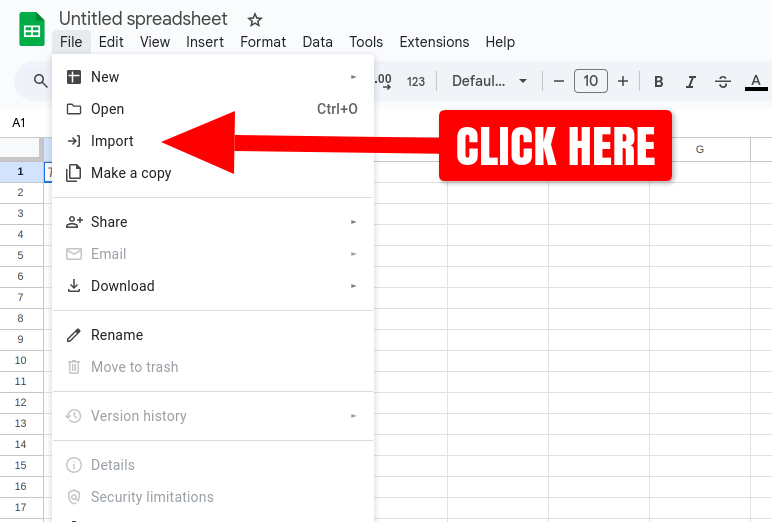
Navigate to the File menu > Import:
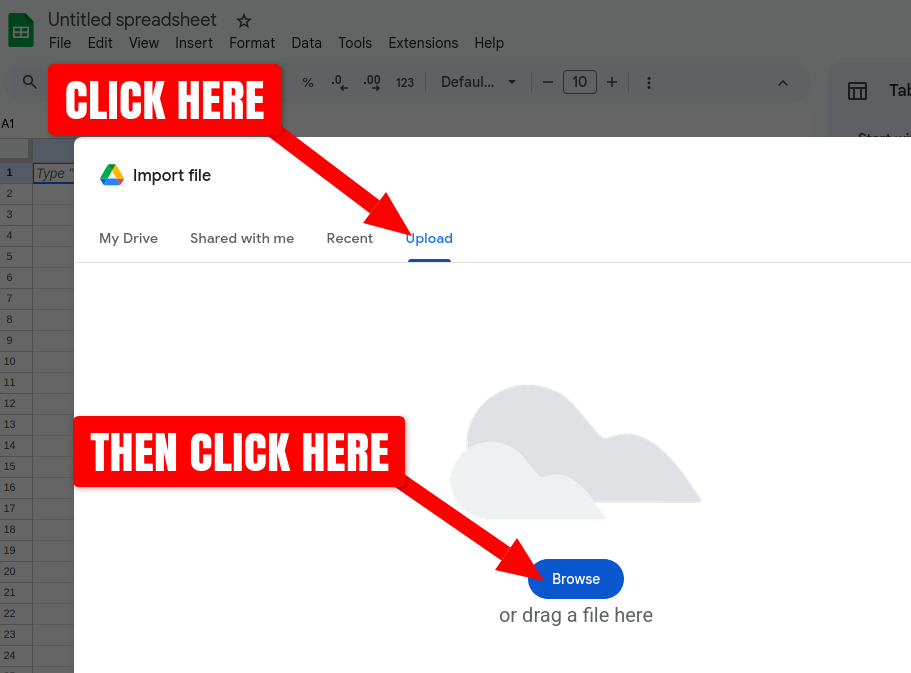
Click on the Upload tab and then Browse button. Use the file picker dialog to navigate and choose the CSV file that you exported from Afternic (the file is named something similar to domains-12345689.csv by default):
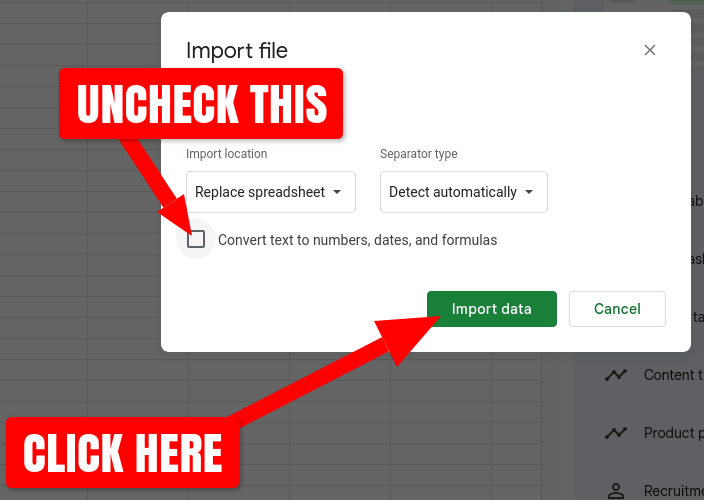
Once the upload completes, the Import file dialog will prompt how you want you format the data. Uncheck the Convert text to numbers, dates, and formulas and then click the Import data button:
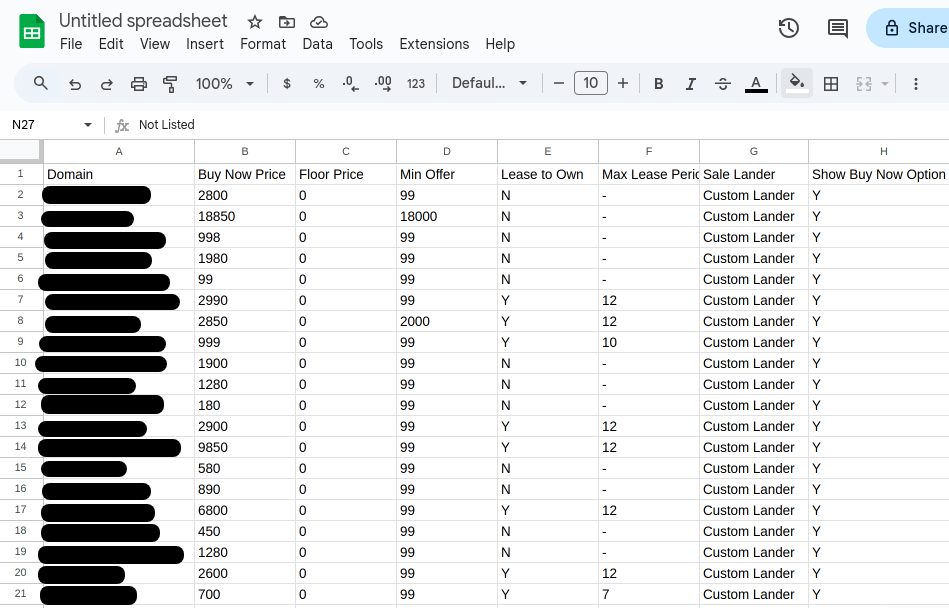
The CSV's data should now be parsed and shown in the Google Sheets spreadsheet:
In order to import your domains into SellerHub, the data's columns need to be arranged to match their supported CSV import format, which is:
Domain,Offer Minimum,Buy Now Price,LTO Period,Downpayment %,For Sale Page
For reference, here is how the columns of Afternic's export CSV map to SellerHub's import CSV format:
| Afternic Export Column | SellerHub Import Column | Notes | ||
|---|---|---|---|---|
Domain |
column A | Domain |
column A | The domain name. |
Min Offer |
column D | Offer Minimum |
column B | The smallest price offer you'll consider from a buyer for the domain name. For SellerHub, omit to disable the minimum offer option, but if omitted, Buy Now Price must be specified. |
Buy Now Price |
column B | Buy Now Price |
column C | The binding price a buyer can pay to purchase the domain immediately. For SellerHub, omit to disable the Buy It Now option, but if omitted, Offer Minimum must be specified. |
Max Lease Period |
column F | LTO Period |
column D | The duration of the Lease to Own purchase option in number of months. For Afternic, this is the maximum number of months the buyer can select. For SellerHub, the number of months is fixed and cannot be selected by the buyer. Omit to disable this option. |
Downpayment % |
column E | The percentage amount of the Buy It Now price the buyer must initially pay when selecting the Lease to Own option (SellerHub only). | ||
For Sale Page |
column F | An on/off indicator whether to show a lander when your domain is visited in a browser (SellerHub only). Enabling this requires the domain to use SellerHub's nameservers. | ||
Reformat CSV Manually
Now that your Afternic domain export has been imported into Google Sheets (or some other spreadsheet software), you can follow the steps below to rearrange the data to match SellerHub's supported CSV import format.
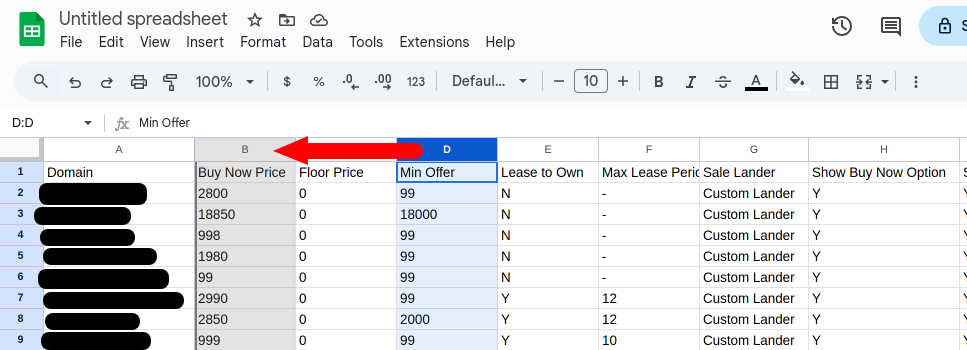
Click the Column D header, so that the entire column is selected, then click it again, and hold and drag it to the Column B position:
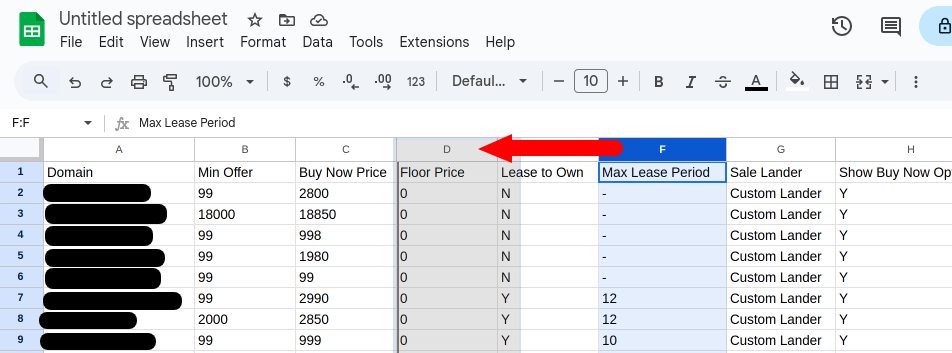
Click the Column F header and drag it to the Column D position:
Rename the first 6 column headers to match SellerHub's column header format. Double-click each column header and type or copy/paste the following names:
- Column B ⮕
Offer Minimum - Column D ⮕
LTO Period - Column E ⮕
Downpayment % - Column F ⮕
For Sale Page
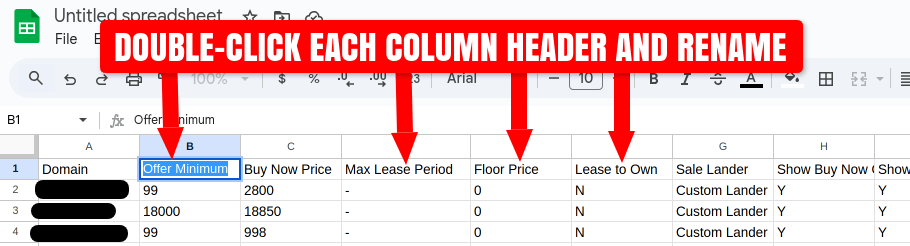
Note that Column A and Column C do not need to be renamed, their existing names are already correct. Additionally, the other G - X columns and their headers can be left as-is, they will be ignored when imported into SellerHub.
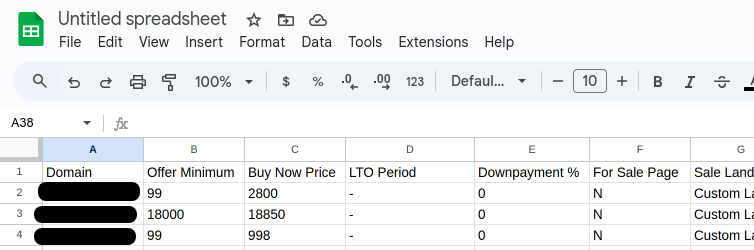
The format of the CSV/spreadsheet column headers (A - F) should now look like this:
- Column B ⮕
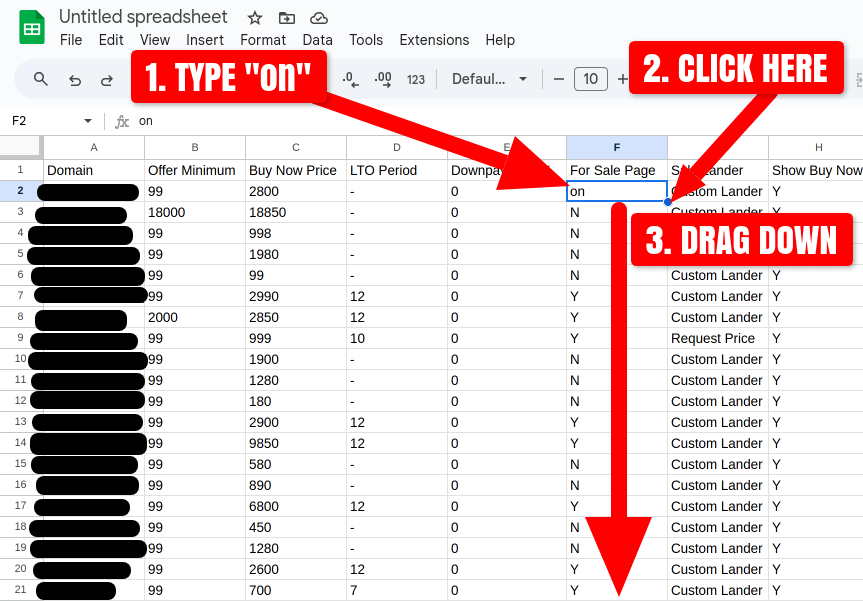
If you want SellerHub to display landers whenever your domains are visited in a web browser, the cells in the
For Sale Pagecolumn must contain the text "on".Click on the cell immediately under
For Sale Page(cell F2) and type "on" (without quotation marks). Hit the Enter key and then click on the F2 cell again. Then click small dot in the bottom-right corner of the cell and hold and drag it downwards to the final row in the spreadsheet. This will populate the entireFor Sale Pagecolumn with the text "on":
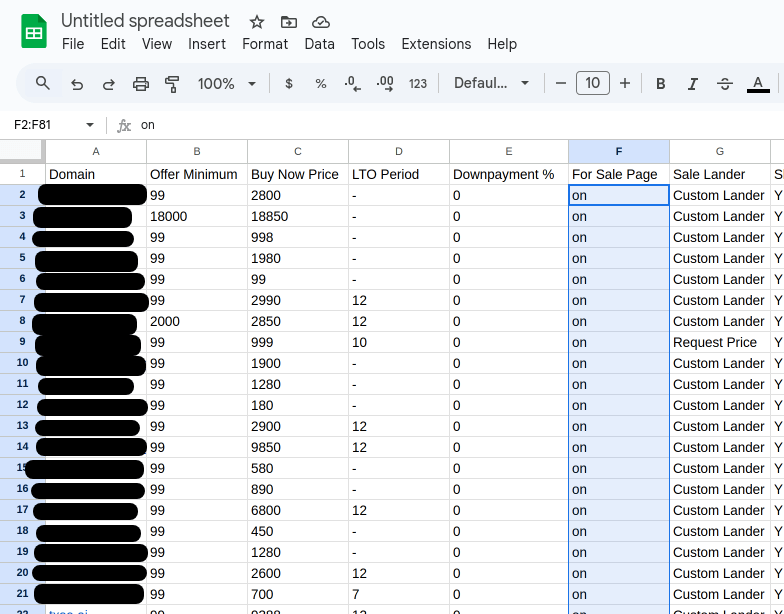
Every row in the
For Sale Pagecolumn should now contain the text "on":
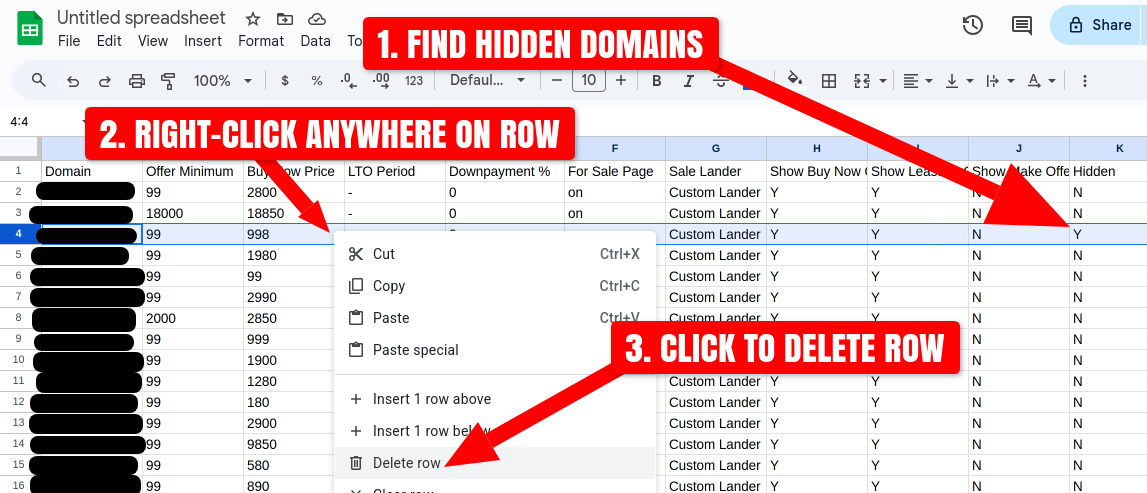
If you have any Hidden domains in your Afternic export, you'll want to remove them from the spreadsheet, otherwise they will be published on SellerHub. Hidden domains on Afternic are those that you have added to their system but you have opted not to be shown in any searches, syndication networks, or landers. SellerHub does not support Hidden domains as Afternic does.
Look for any domains with a "Y" in Column K, right click the row to bring up the context menu, and select Delete row:
Make any final edits to your domains as necessary, such as modifying the
Buy Now Price,LTO Period, orDownpayment %values. Note that SellerHub will ignore any values less than 100 in theBuy Now PriceandOffer Minimumcolumns.When ready, export the spreadsheet to a CSV file. Navigate to File menu > Download > Comma Separated Values (.csv) and save the file locally to your device:

Import To SellerHub
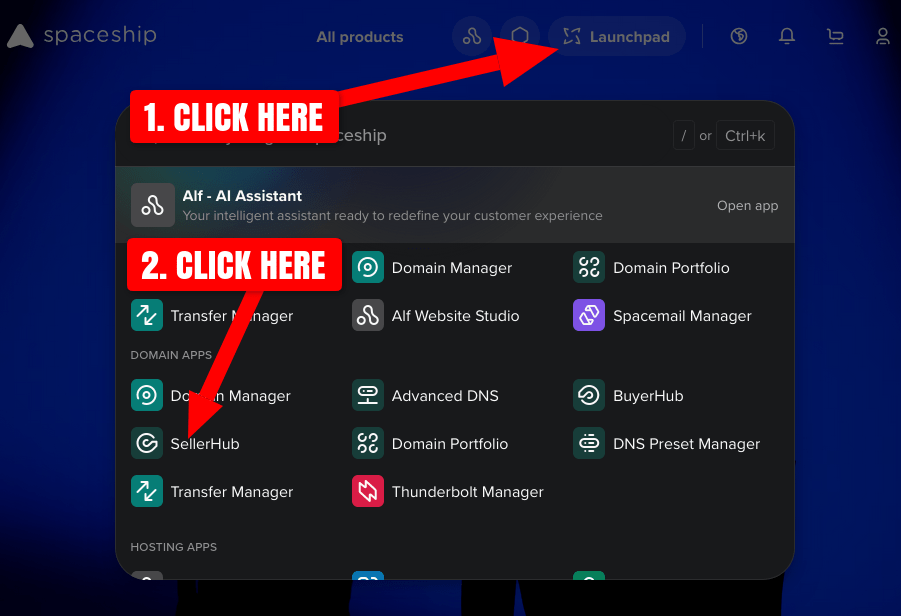
Once the Afternic domain export CSV file has been property formatted, you're ready to import it into SellerHub. Log in to your Spaceship account and navigate to Launchpad > SellerHub > Domains:
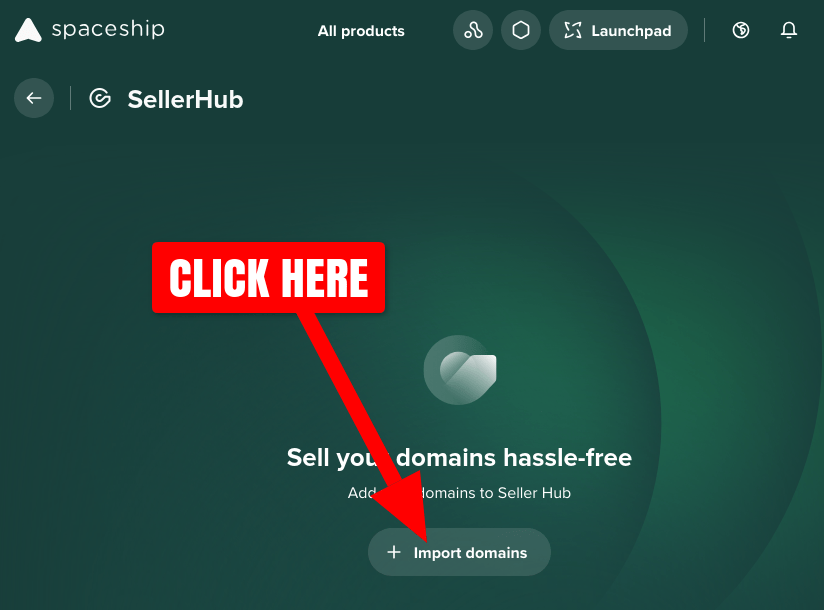
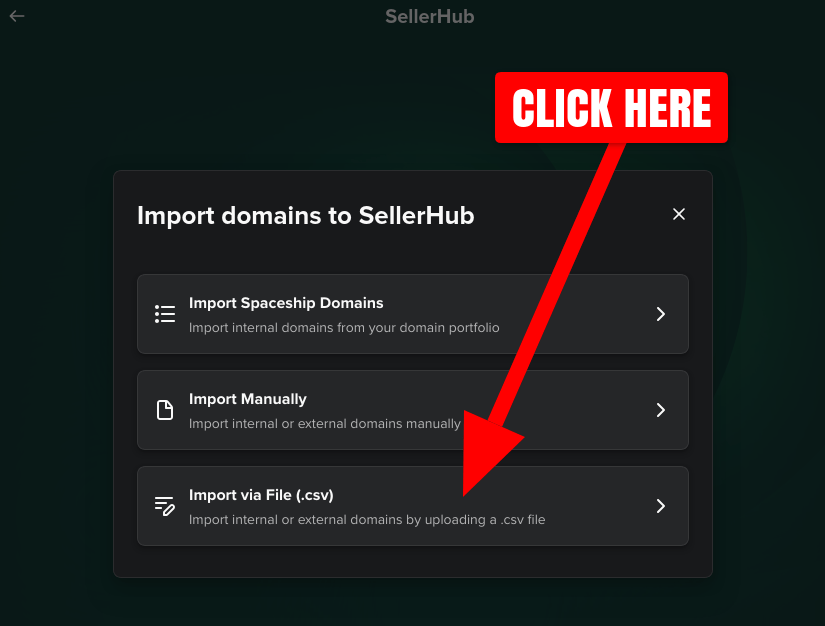
To start the import process, clicking the Import domains button and then Import via File (.csv):
Click the Upload a file button, select the reformatted .csv file you saved locally to your device, and click the Import domains button:
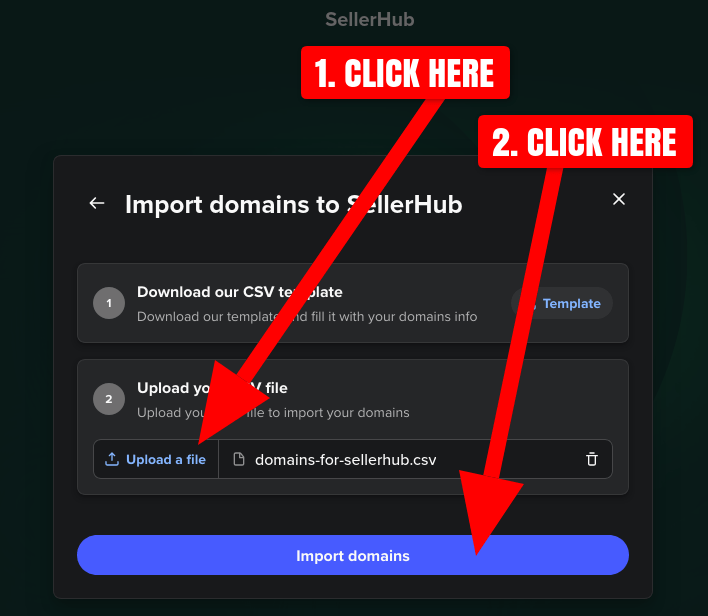
Spaceship SellerHub will begin importing your domains, which may take a few minutes minutes depending on how many domains were in the .csv file you uploaded. Once the import is complete, a "Success - All items have been processed successfully." popup will appear. Click the on the Domains tab to view your imported domains:
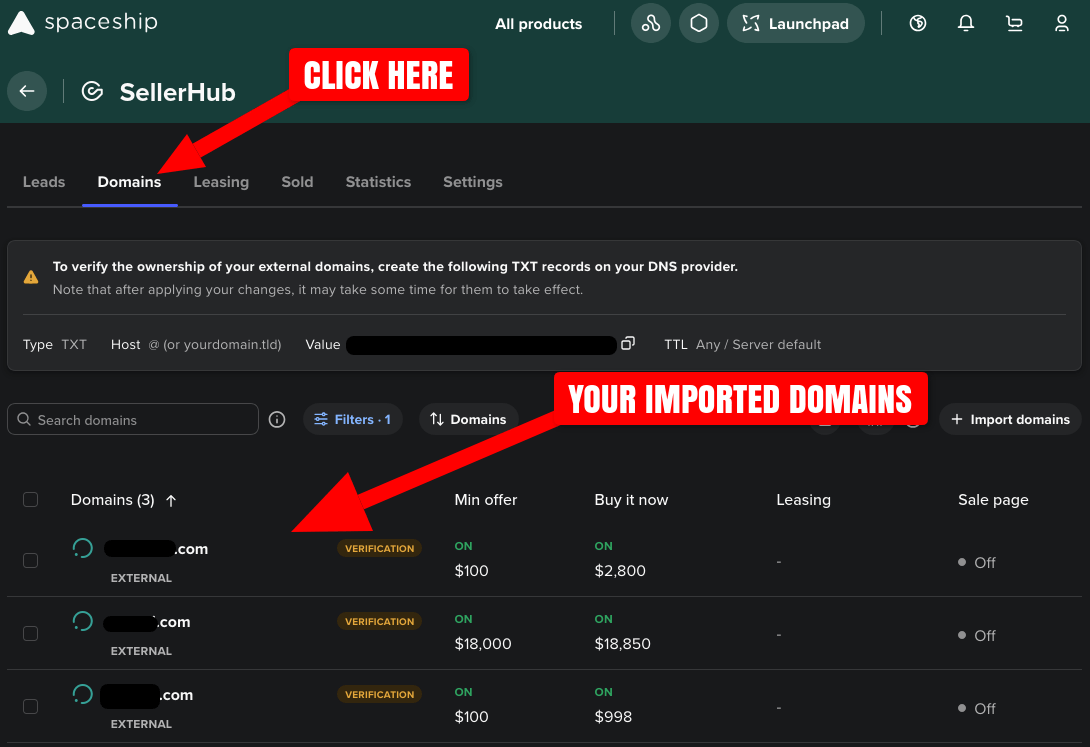
Note that the Sale page and Leasing values for your imported domains will not be shown correctly until you have verified the ownership of your domains with SellerHub.
Verify Domain Ownership
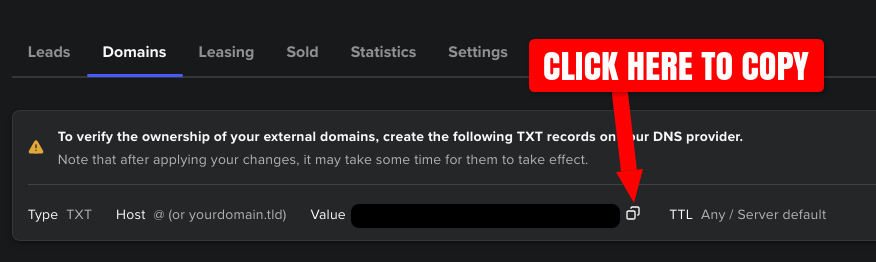
Before your domains can be listed for sale, you must prove that you actually own them. SellerHub verifies ownership by checking that a unique value, provided by SellerHub, is set in a TXT DNS record for each of your domains. It's up to you to set this value in a new DNS record for every domain name you have imported into SellerHub.
Here's how to begin the verification process:
Copy the Value for the TXT record at the top of the SellerHub Domains page. This ID (comprised of a bunch of letters and numbers) is unique to your SellerHub/Spaceship account:
-
Browse to the service that manages the DNS for your domain names. Typically this is the current registrar of your domains.
You'll want to use bulk domain management if your DNS provider/registrar provides it to create the TXT DNS verification records. This will allow you to specify the new record only once, and the service will create it for every one of your applicable domains automatically.
If your DNS provider doesn't support bulk DNS actions, you'll need to manually create a new TXT DNS record for each of your imported domains individually.
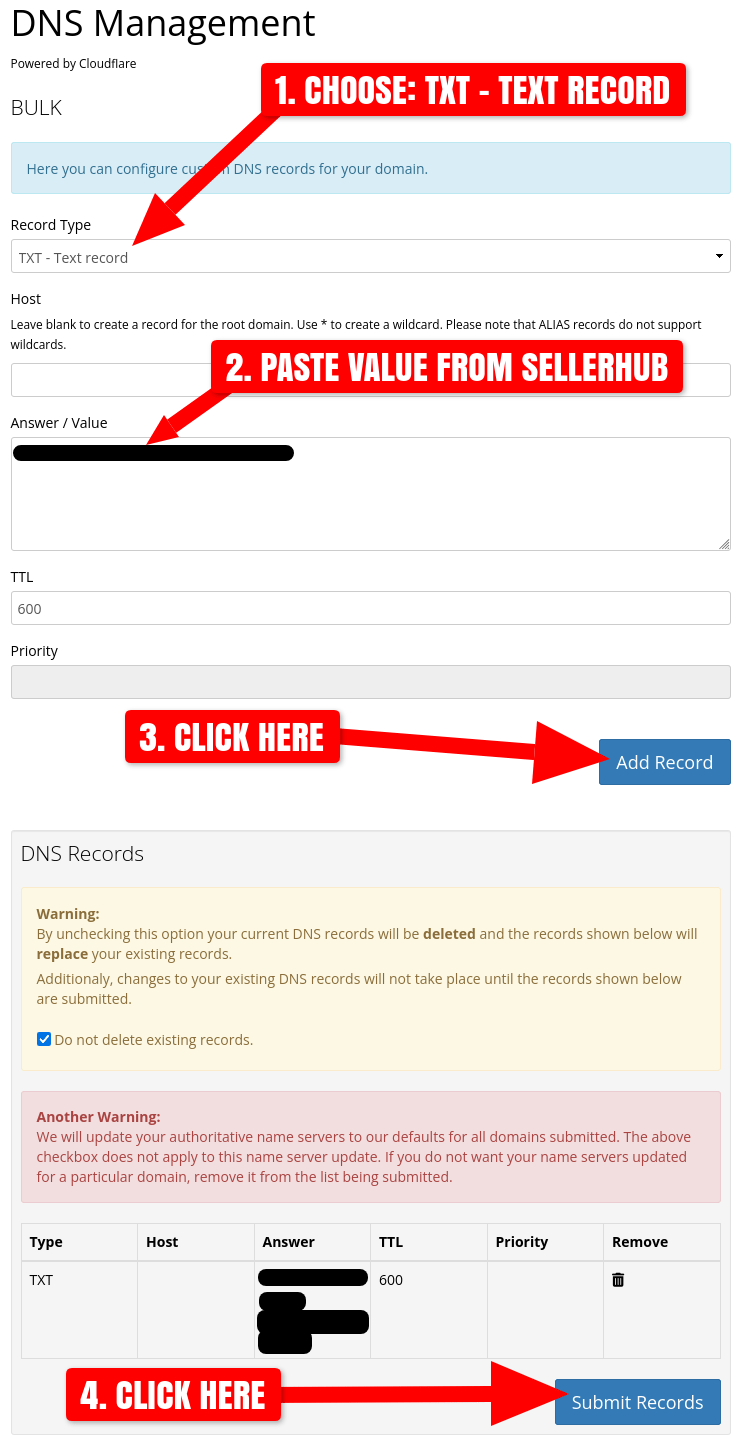
As an example, the bulk DNS management process will be illustrated using Porkbun's Bulk Domain Management (the process for your own provider may vary slightly). Enter or copy/paste your domain names into the bulk input and click DNS Records:
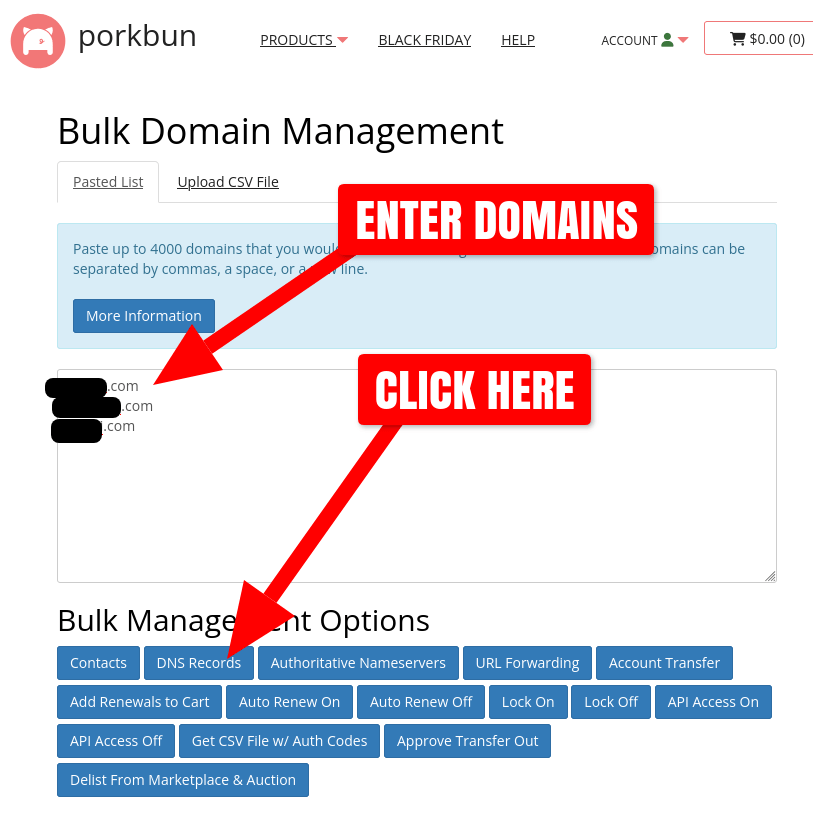
Set the following options for the new TXT record:
Record Type TXT - Text record Host Leave blank or type "@" (without quotes), depending on your provider. Answer / Value Paste the Value text that was provided by SellerHub.
Below is a screenshot of the settings for the TXT record on the Porkbun bulk DNS management page:
-
Next you'll need to wait for DNS records to be created and the SellerHub verification process to complete. It seems to take 30-60 minutes for SellerHub to verify the TXT records for newly imported domains.
Once verified, your domains in SellerHub > Domains will show a status (reload the page to refresh the status), along with any imported Leasing options:
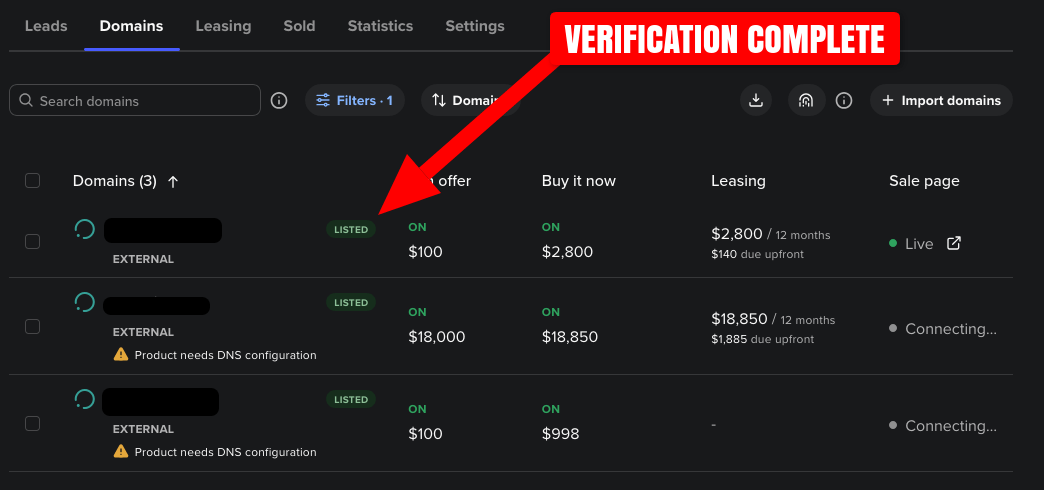
Now that SellerHub has verified your domains, they will appear in Spaceship and Namecheap domain name searches, as well as the Namecheap Marketplace.
Connect Domains for Lander Support
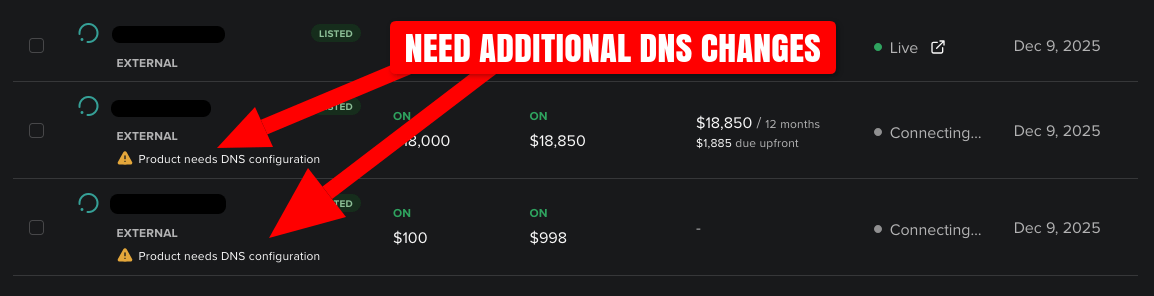
In order for SellerHub landers (a.k.a. For Sale Pages) to show when any of your domains are visited in a browser, additional DNS changes must be made to your domain names. The imported domains requiring these changes are marked with a "Product needs DNS configuration" warning message in SellerHub > Domains:
SellerHub offers two different options for enabling landers for the domain names you're selling:
- Change nameservers to Spaceship.com: The easier option that allows Spaceship to manage the necessary DNS records for your landers. Additionally, this enables HTTPS/SSL support for you domains, plus gives you access to Spaceship DNS management.
- Setup A records that point to Spaceship.com: For more advanced users who do not want to change their nameservers. No HTTPS/SSL support.
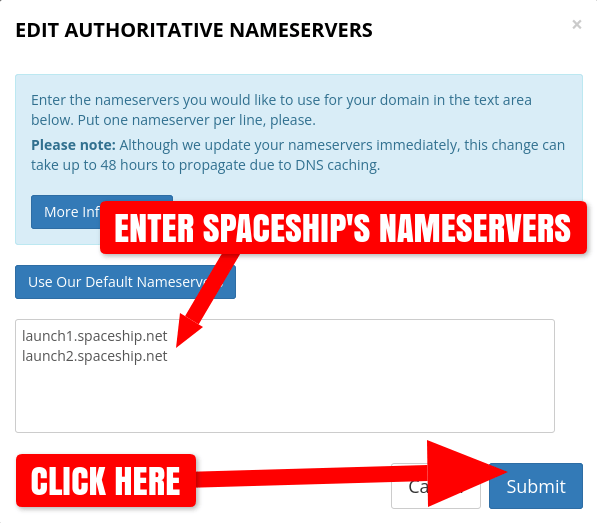
The following steps will cover Option #1 - Change nameservers to Spaceship.com. As illustrated in Verify Domain Ownership, you'll want to use your registrar's or DNS provider's bulk domain management to change your domains' nameservers to Spaceship's nameservers, which are:
launch1.spaceship.net
launch2.spaceship.net
The bulk nameserver change process will again be shown using Porkbun's Bulk Domain Management (the process for your own provider may vary slightly). Enter or copy/paste your domain names into the bulk input and click Authoritative Nameservers:
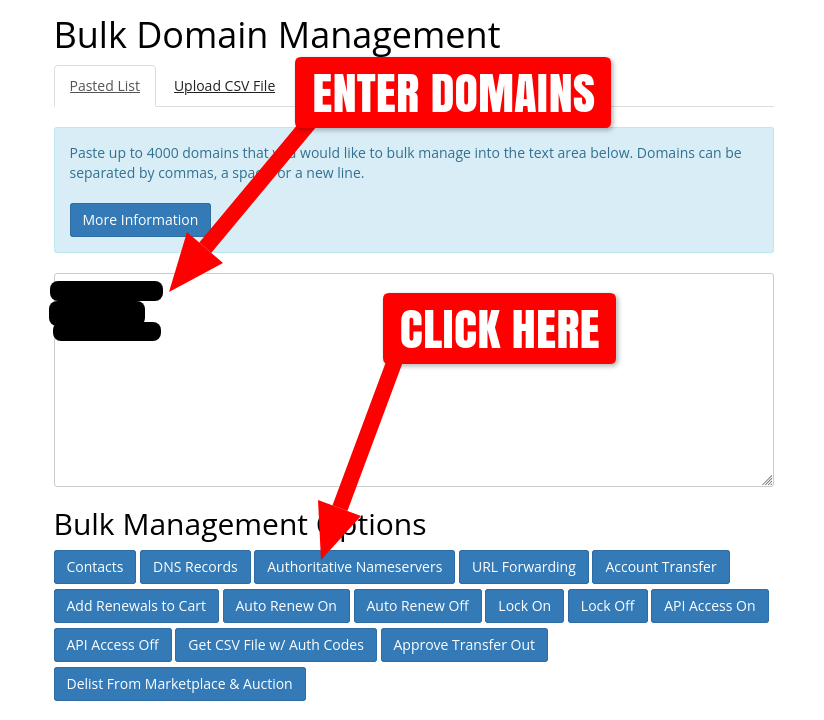
Enter Spaceship's nameservers into the input box and click Submit:
Again, you'll need to wait for the bulk nameserver changes to be made, propagate, and for Spaceship to verify the changes. This process can take up to 48 hours, but in most cases will only take 30-60 minutes.
Once complete, your domains in SellerHub > Domains will show a indicator in the Sale page column:
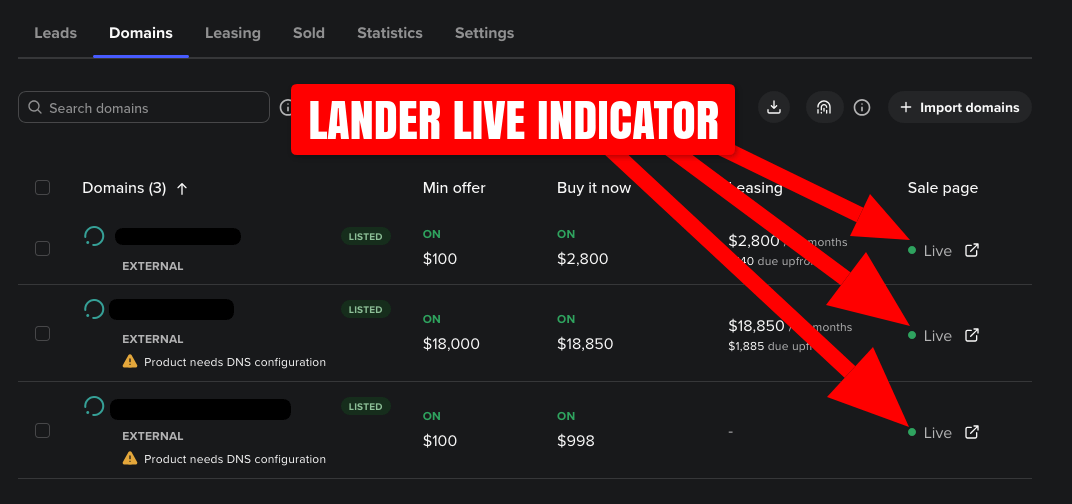
Note that the "Product needs DNS configuration" warning message should disappear within a few hours.
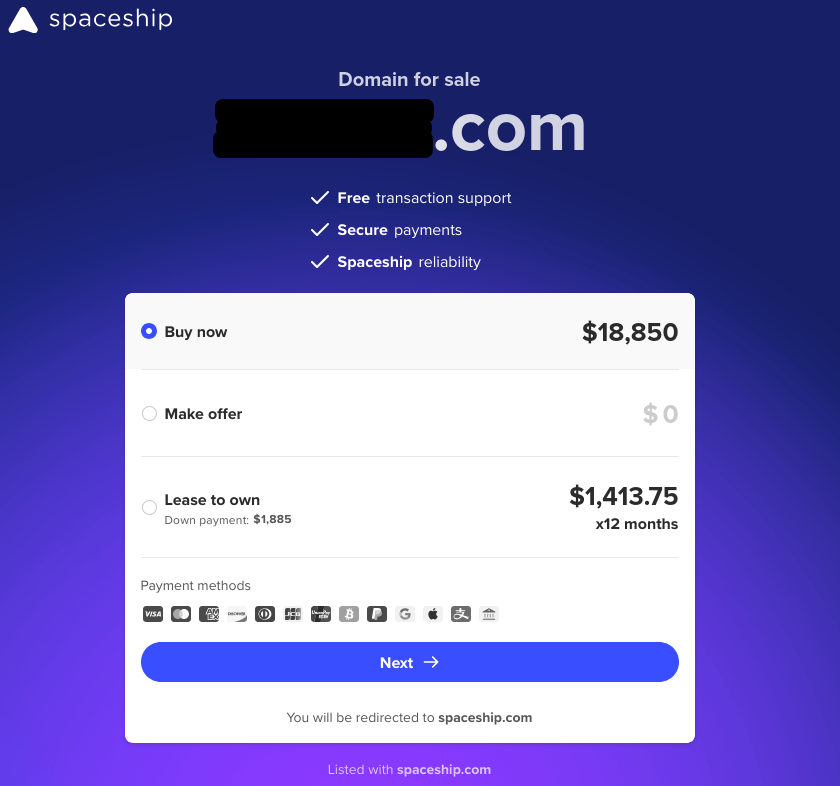
Visiting any of your imported domains in a browser should now show a Spaceship lander with all the specified pricing options. The landers should also have HTTPS/SSL support, though this may take some additional time for Spaceship to obtain the necessary TLS/SSL certificates from Let's Encrypt:
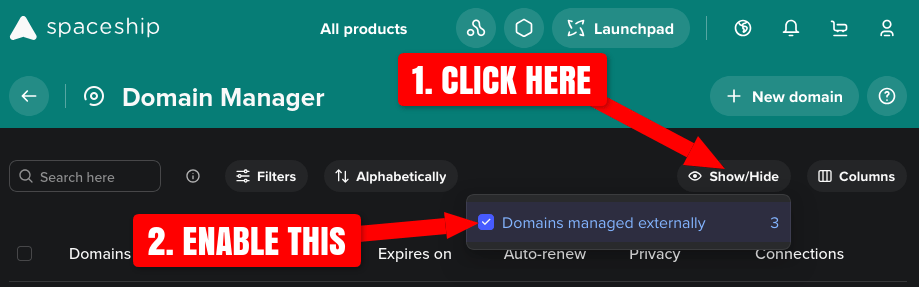
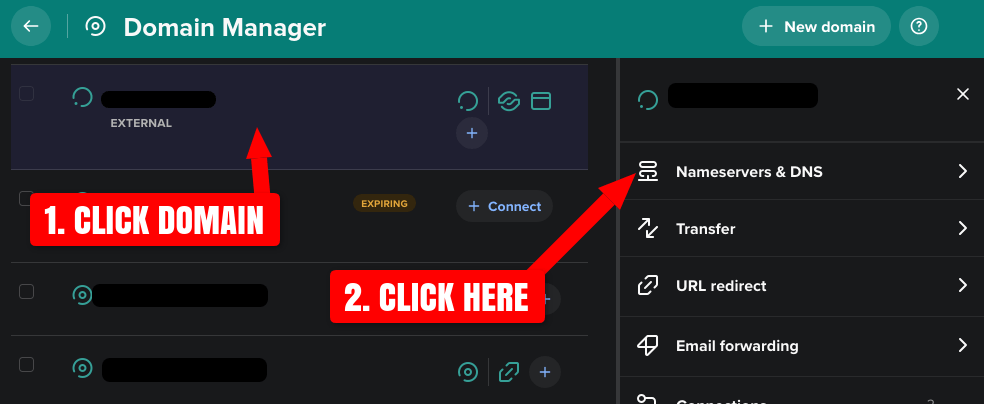
Now that your nameservers are set to Spaceship's nameservers, you'll have access to Spaceship DNS management for those domains. If you need to make additional DNS changes to your domains, navigate to Launchpage > Domain Manager and click the Show/Hide button. Check the Domains managed externally checkbox to include your imported domains in the list:
From there, you can manage the DNS records of your external domains by clicking on the domain name, then Nameservers & DNS:
Test Searches and Landers
The final optional step is to manually verify everthing is working as expected. As your domains are still listed with Afternic, your listings are syndicated to their various partner registrars and marketplaces. So you should expect your domains to be shown in the following marketplaces with the correct pricing:
- Godaddy search
- Porkbun search
- Dynadot search
- Ionos search
- Namecheap search
- Namecheap Market Buy Now search
- Spaceship search
Additionally, if you opted into Spaceship's landers (a.k.a For Sale Pages), then a Spaceship lander web page should be shown when visiting any of your listed domains in a web browser.
Keep in mind that if you are no longer using Afternic's nameservers for your domains, their commission increases to 25% for sales made via their partner syndication network. So you may consider raising your domains' prices on Afternic to compensate for this difference.